
-

Phone: +86-400-678-0576
-

E-mail: Stevenhan@cnbsj.com
-

Fax: +86-576-85726668


 English
 русский
 عربى
 Español
NEWS
 Home / News / Industry News / Stainless Steel Sink Drain Guide: Types, Sizes, Materials and Installation
Stainless Steel Sink Drain Guide: Types, Sizes, Materials and Installation
 2026.11.16
 Industry News
Content
- 1 Why a Small Part Decides Whether a Sink Works
- 2 Anatomy: What Is Actually Inside a Stainless Steel Sink Drain
- 3 Materials and Finishes That Survive Daily Use
- 4 Three Regional Styles — and Why the Thread Decides Everything
- 5 Single Bowl or Double Bowl: Matching the Drain to the Sink
- 6 Dimensions That Actually Matter
- 7 Installation Without Callbacks
- 8 When Something Goes Wrong: Six Common Complaints
- 9 A Maintenance Calendar That Takes Minutes
- 10 Specifying Thousands Instead of One
- 11 Frequently Asked Questions
- 11.1 Is a stainless steel sink drain better than a plastic one?
- 11.2 What size is a standard kitchen sink drain opening?
- 11.3 Why does my drain smell even after cleaning?
- 11.4 Can I replace just the basket instead of the whole drain?
- 11.5 Does a deeper basket reduce drain speed?
- 11.6 How long should a good stainless steel sink drain last?
Most people only think about the drain when it is already a problem: water standing in the bowl, a faint smell drifting out from under the cabinet, a slow drip that has quietly ruined the shelf liner. Yet that small assembly — a few hundred grams of stainless steel, rubber and brass — sits at the exact point where the daily life of a kitchen meets the plumbing that carries waste away. Get it right and nobody notices it for a decade. Get it wrong and every meal prep becomes a small negotiation with standing water.
This guide walks through what a stainless steel sink drain actually consists of, how the material choices affect lifespan, why thread standards differ between regions, and how to install one so that it does not come back as a callback. It is written from the perspective of a factory that has been making sink drains for more than 23 years, and it is aimed at the people who specify, install, sell or simply live with them.
Why a Small Part Decides Whether a Sink Works
A sink is a bowl with a hole in it. Everything else — the faucet, the basin shape, the finish — is decoration around that hole. The drain controls the flow rate, the seal against odour, the mechanical connection to the waste pipe and, in many cases, whether the cabinet underneath stays dry. Four functions, one part, all of them quietly critical.
Flow
A standard 3-1/2 inch opening with a well-pierced basket can empty a full bowl in well under two minutes. A stamped basket with narrow slots, or a badly seated gasket that narrows the tailpipe, can double that time.
Seal
Odour comes up, not down. The trap holds a water barrier; the drain's job is to be airtight at the flange and at every threaded joint so that barrier is the only thing between the kitchen and the sewer line.
Lifespan
Food acids, hot water, mild detergents and the occasional descaling agent are mild individually and corrosive together over years. The grade of stainless and the thickness of the flange decide how long the part stays bright.
Service
A drain that can be removed by hand, without a wrench and without cutting the trap, turns a forty-minute job into a five-minute one — a detail installers remember when they choose the next project's hardware.
Anatomy: What Is Actually Inside a Stainless Steel Sink Drain
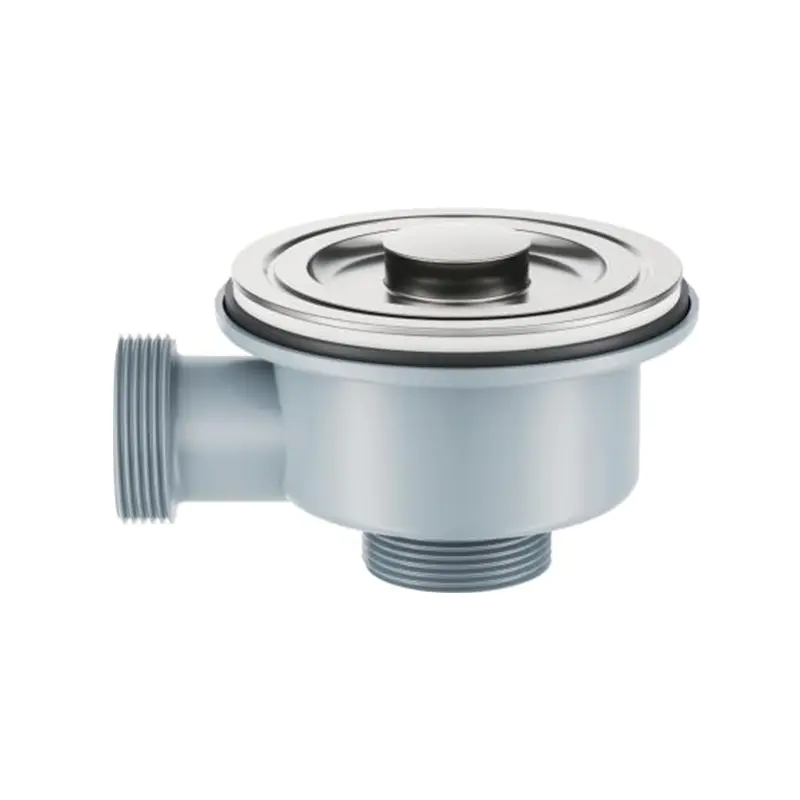
From the top of the sink to the trap, a typical assembly passes through six stages. Each one has its own tolerances, and each one is a potential leak point if the order or the torque is wrong.
1. The strainer flange
The visible stainless ring that sits flush with the sink bottom. Depth of the flange matters: too shallow on a thick fireclay or composite sink and the basket will not seat; too deep and it will not seal against the basin.
2. The basket or stopper
Either a perforated stainless basket, a pop-up stopper with a rubber seal, or a flip-top plug in regions where that style is standard. The basket's open area is the single biggest influence on drain speed.
3. The gasket stack
Usually a thin top gasket (often silicone or EPDM), a friction ring, a paper or rubber washer below the basin, and a second sealing washer. Skipping one causes the classic drip that appears only when the bowl is full.
4. The locknut
Hand-tightened or wrench-tightened depending on the model. A nylon-insert locknut holds better against thermal cycling than a plain metal nut, particularly around dishwashers that discharge hot water in bursts.
5. The tailpiece
The threaded tube that carries water away. Its length determines how much room is left for the trap, which is why deeper basins often need a shorter tailpiece and a compact trap arrangement.
6. The trap adapter
The transition from the drain thread to the waste pipe. Slip-joint nuts with tapered washers are the most serviceable; glued or crimped adapters save space but sacrifice access.
Materials and Finishes That Survive Daily Use
The name "stainless" is a description of a family, not a guarantee. A drain stamped from a thin 201-grade sheet will show tea-coloured staining within a season in a hard-water area; a 304-grade body with a properly passivated surface will still look new years later. Brass bodies with a stainless cap are another common compromise: the thread holds up beautifully, the visible face keeps its shine.
| Part | Common material | What it delivers | What to check |
|---|---|---|---|
| Flange and body | 304 stainless steel | Corrosion resistance, easy cleaning, bright finish | Sheet thickness and edge polishing |
| Basket | Stainless steel, sometimes plated | Debris capture without restricting flow | Slot width and open area ratio |
| Threaded shank | Brass or stainless steel | Clean threads that survive repeated assembly | Thread standard and pitch accuracy |
| Gaskets | Silicone, EPDM, or rubber | A watertight seal under thermal cycling | Hardness, thickness, heat tolerance |
| Locknut | Stainless steel with nylon insert | Stays tight as the sink expands and contracts | Thread engagement length |
| Finish | Brushed, polished or PVD coated | Scratch resistance and colour consistency | Salt-spray performance and colour batch match |
Finish is where most specification arguments begin. Brushed satin hides water spots and matches the majority of modern kitchen sinks; polished mirror suits traditional basins but shows every fingerprint; coloured PVD finishes are popular but must be matched batch to batch, because a slightly warmer gold on a replacement drain is immediately visible next to an older one. If you are weighing up which combination suits a particular installation, this guide on choosing the right kitchen sink drain by material and size goes deeper into the trade-offs.
Three Regional Styles — and Why the Thread Decides Everything
A drain that fits perfectly in Frankfurt will not fit in Ohio. The difference is not cosmetic; it is dimensional, and it starts at the sink opening and the outlet thread.
American style
A 3-1/2 inch sink opening with a 1-1/2 inch NPSM outlet thread is the default. Assemblies tend to be deeper and heavier, with a long shank that suits thick cast-iron and stainless sinks and a generously sized basket. Double-layer bodies are common because they seal more reliably on uneven basin surfaces.
Japanese and Korean style
Often built as a compact, integrated unit in which the drain and its odour-control flap or cup seal live in a single housing. The emphasis is on a low profile, fast disassembly for cleaning and a tight seal that prevents sewer gas from entering small kitchens.
European basins, by contrast, frequently use a 1-1/4 inch outlet because the basins themselves are smaller. Fitting a 1-1/2 inch drain into a slotted 1-1/4 inch hole, or the reverse, is the most common cross-border ordering mistake in this category — and it is entirely avoidable with a dimensioned drawing rather than a model name.
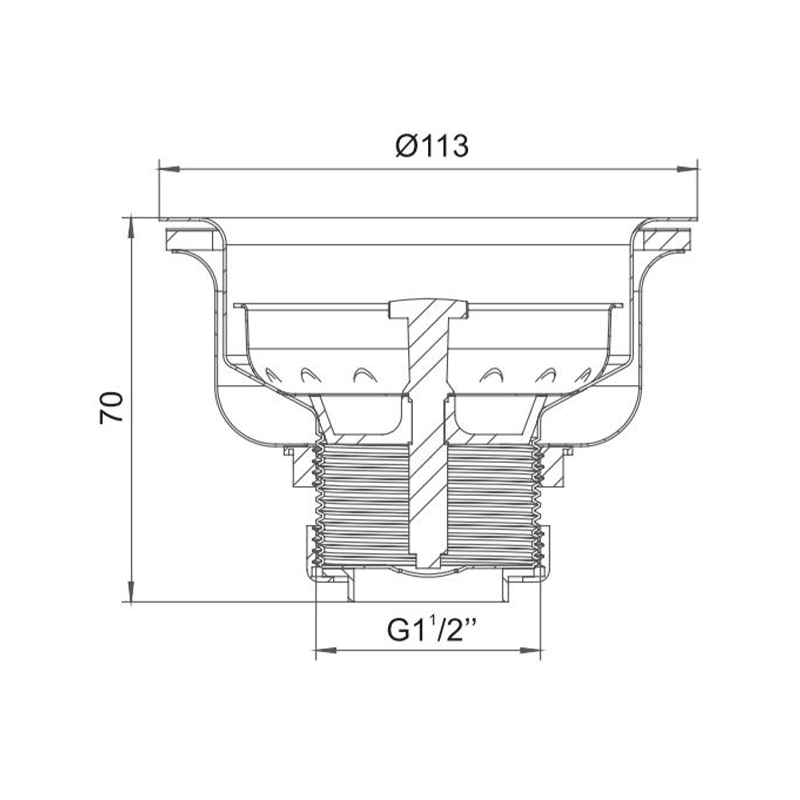 BSJ376 American-Style Double-Layer All-Steel Sink DrainA durable American-style drain with dual-seal trap, brushed finish, and telescopic tailpipe for demanding kitchen layouts and complex under-sink fitment.View Product →
Where a slim, odour-controlled unit suits the market better, an integrated design such as the BSJ101, with its built-in anti-odour structure, removes an entire component from the trap layout and simplifies what has to fit inside a shallow cabinet.
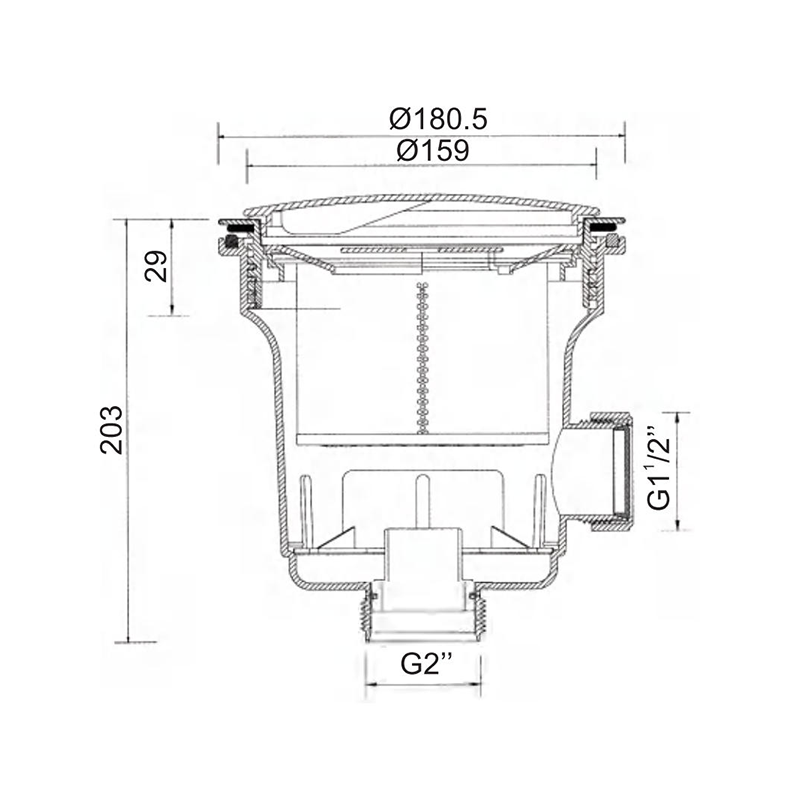 BSJ101 Integrated Odor-Proof Drain for Large Single-Basin SinksFor large single-basin kitchens, this 185 mm integrated odour-blocking drain simplifies shallow-cabinet plumbing and adds a high-capacity debris collector.View Product →
Single Bowl or Double Bowl: Matching the Drain to the Sink
The bowl count changes the plumbing, not just the volume. A single bowl feeds one drain into one trap; a double bowl either shares a single trap through a Y-branch or runs two separate traps. Both layouts work, but they fail in different ways, and the overflow route has to be planned before anything is screwed down.
| Aspect | Single bowl | Double bowl |
|---|---|---|
| Drain points | One | Two, usually with one overflow each |
| Trap arrangement | Direct P-trap | Y-branch to a shared trap, or two traps |
| Typical pipe kit | Single bowl overflow trap | Double bowl Y-type or extendable trap |
| Main risk | Space behind the bowl for the trap body | Unequal flow and cross-flow between bowls |
| Service access | Straightforward | Needs a removable branch or extendable section |
A rear outlet is worth specifying when the cabinet is shallow or a drawer sits directly behind the trap: the water leaves backwards rather than straight down, which frees several centimetres of usable depth. For double bowls, an extendable trap section means the two bowls can be spaced to match the sink rather than the sink being chosen to match a fixed pipe.
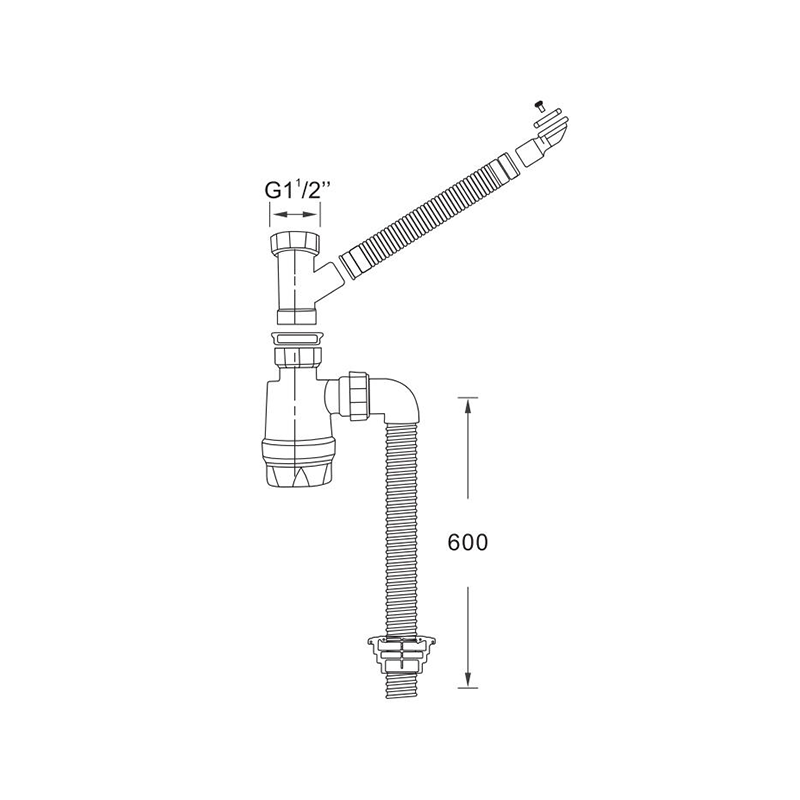 BSJ705DY Single-Bowl Overflow Anti-Odor Trap Drain PipeThis deep-seal gravity trap has a quick-release cap for clearing debris and suits odor-sensitive kitchens with high drain positioning.View Product →
Dimensions That Actually Matter
Every measurement below can be verified with a caliper in under a minute, and doing so prevents almost every fitment return in this product category. The bars show relative scale rather than precision, but the numbers beside them are the standards worth remembering.
Two further numbers decide whether the assembly fits at all: the maximum basin thickness the shank can clamp, and the vertical clearance between the sink bottom and the cabinet floor. A drain with a 30 mm shank will not clamp a 40 mm stone sink no matter how much sealant is used, and a deep basket trap under a shallow cabinet will force the entire layout to be redesigned.
Installation Without Callbacks
The sequence below is the one that produces the fewest leaks in our experience, and it takes roughly twenty minutes on a clean installation.
1. Clean and inspect the opening
Remove old sealant, check that the hole edge is not burred, and confirm the opening diameter. A bevelled or uneven edge is the most common cause of a persistent weep.
2. Fit the upper gasket dry
Seat the top gasket under the flange without sealant. Plumber's putty is still used in some markets, but silicone gaskets are easier to service and do not harden.
3. Insert and centre
Push the body through from above and check the flange sits flat all the way round before anything is tightened underneath.
4. Assemble the lower stack in order
Friction ring, sealing washer, then locknut. Reversing the two washers is the single most frequent assembly error we see in returned units.
5. Tighten by hand, then a quarter turn
Over-tightening distorts the gasket and creates a slow leak that only appears under load. Snug is enough.
6. Connect the trap and test
Fill the bowl to the overflow, release, and watch every joint with a torch. Repeat with hot water to check the seal under thermal expansion.
7. Dry and document
Wipe the cabinet dry and note the model fitted. The next service visit then starts with the right part in hand.
When Something Goes Wrong: Six Common Complaints
Almost every service call in this category falls into one of six patterns. Each has a specific cause, and none of them require replacing the whole sink.
Water pools in the cabinet
Usually the lower gasket stack, not the flange. Dry everything, refill the bowl and watch which joint darkens first.
The bowl drains slowly
Often a partially blocked trap rather than the strainer. Remove the basket, then open the trap and check the dip tube.
Gurgling after draining
A sign of an improperly vented or partially blocked waste line. The drain itself is rarely at fault.
Smell that returns after cleaning
A dry or shallow trap, or a missing gasket at the trap adapter. A deep-seal trap and an airtight joint solve both.
The stopper will not hold water
Check the rubber seal for food residue and the linkage adjustment. In pop-up models, a quarter turn of the rod usually restores the seal.
Rust-coloured staining
More often hard-water mineral deposit than corrosion, but on thin 201-grade bodies it can indicate genuine surface breakdown.
A Maintenance Calendar That Takes Minutes
Weekly
Lift the basket, rinse it, and pour a litre of hot water down the drain to move grease through the trap before it sets.
Monthly
Wipe the flange with a soft cloth and mild detergent. Avoid chlorine-based cleaners on stainless; they attack the passive layer.
Quarterly
Check the joints under the sink by hand and with a torch. Tighten a quarter turn if anything feels loose, especially after a cold season.
Annually
Remove the trap, clear the dip tube, inspect gaskets for hardening, and replace any that have lost their elasticity.
Specifying Thousands Instead of One
For distributors, brands and project buyers, the questions shift from "will it fit" to "will ten thousand of them behave identically". That requires control over sheet thickness, gasket hardness, thread pitch, polishing consistency and packaging — the parts of the process a buyer never sees until something drifts.
Our own production sits on a 20,000 square metre site with 22,800 square metres of built floor space in Taizhou, Zhejiang, close to the port at Toumen and within easy reach of Ningbo and Wenzhou. Around 300 people work here, including more than 50 in management, R&D and sales, and the product range runs from American and Japanese/Korean style sink drains through basin wastes, washer drains, traps and garbage disposals. Buyers who want to look at the process rather than a catalogue can review our manufacturing and quality capability, or visit the factory floor directly.
What that means in practice for a specification conversation: thread standard and outlet size confirmed with a drawing, material grade agreed per component rather than per product, gasket compound matched to the water chemistry of the destination market, and packaging designed for the way the goods will actually be handled. Those four items resolve most of the disputes that otherwise arrive six weeks after shipment.
Frequently Asked Questions
Is a stainless steel sink drain better than a plastic one?
For the visible body and thread, yes — stainless steel and brass hold threads, resist heat and clean up far better than moulded plastic. Many good assemblies combine both: a stainless flange and basket with a plastic trap body, which keeps weight and cost down where corrosion risk is low.
What size is a standard kitchen sink drain opening?
In North America, Japan and Korea it is almost always 3-1/2 inches (88.9 mm), with a 1-1/2 inch outlet thread. European basins more commonly use a 1-1/4 inch outlet. Always measure the actual hole before ordering a replacement.
Why does my drain smell even after cleaning?
Odour normally travels up past a dry trap or an imperfect joint, not from the basket. Check that water sits in the trap, that the trap adapter is sealed, and that the drain has a proper gasket stack rather than a single washer and sealant.
Can I replace just the basket instead of the whole drain?
Often yes, if the body is a common size and the manufacturer still supplies the part. If the flange itself is pitted or the thread is damaged, replacing the full assembly is faster and more reliable than chasing a seal.
Does a deeper basket reduce drain speed?
Not on its own. What reduces flow is a small total open area and clogged slots. A deep basket with generous piercing actually improves performance because it holds more debris without blocking the outlet.
How long should a good stainless steel sink drain last?
Over a decade is normal for a well-made 304-grade unit with silicone gaskets. Gaskets, not the metal, are usually the first thing to fail, and they are also the cheapest thing to replace.
The stainless steel sink drain is one of those components that only earns attention through failure — but the difference between a part that disappears into the background for fifteen years and one that drips every winter comes down to a handful of decisions made long before installation: the grade of steel, the order of the gasket stack, the thread on the outlet and the depth of the trap. None of them are complicated. All of them are worth getting right the first time.
Recommended News

Be a top expert in underwater engineering, build a renowned international brand, become an outstanding manufacturing enterprise, and strive to be an industry leader at home and abroad.
Contact Information
Add: No. 3 Beiyang 4th Road, Beiyang Industrial Park, Shangpan, Duqiao Town, Linhai City, Zhejiang Province, China
Tel: +86-576-85726188 / +86-400-678-0576
Fax: +86-576-85726668
E-mail: boshijie8885@163.com / Stevenhan@cnbsj.com
Copyright © Zhejiang BOSHIJIE Kitchen & Bath Technology Co., Ltd. All Rights Reserved.
Privacy Custom Washbasin Sink Drainer Factory